Tuesday, May 21, 2013

In a Rut!


My hubby Tyrone working hard!

You bet your Grass it works!

We had two very deep ruts in our front yard caused by washout and not so great grading by the builders before they laid the sod. They were a huge hazard and I was tired of twisting my ankle so we looked into having it filled in and seeded, but the landscape company wanted a ridiculous amount of money for dirt. I couldn't believe it! I decided that we could do it ourselves! So anytime I was planting new things this spring I would dig out the thick heavy clay soil we have, put it in the ruts and then fill the holes in the flower beds with good garden soil. This worked out very well, and it filled in the ruts quickly. It did take some work to get it leveled out well and at the time we did not have a tamper tool to do this easily so it was a matter of using your feet to stomp it down and then walking around and feeling where the uneven areas were and then filling them in. We then added a thin layer of garden soil and used a garden rake to mix it in before we put the seed down to give it a good base to grow in.
Close up of our patchwork.


We used Scotts EZ Seed which has fertilizer and grass seed mixed in together. This is a GREAT product and I highly recommend it! It is very easy to use. You spread a layer of the EZ seed on where you need it, water it regularly and watch it grow!


May 3rd


This is what the patches looked like after we put the EZ Seed down and watered it thoroughly, it's kind of fun to watch because the fertilizer expands to hold moisture in.

It kind of reminded me of the little sponges we use to get as a kid that came in a capsule and you put them in water and watched them grow into some kind of animal. :)


May 17th

 In just 14 days we had really good grass growth, there were a couple of areas that had minimal growth and we had to add more seed.
Now it is growing in very well and is just about to the point that it needs cut.
If you have any areas like this in your yard that need filled in or have bare patches that need grass, give it a try, you will be amazed at how easy it is!

Sunday, May 12, 2013

Spring Cleaning!

Step it up! 


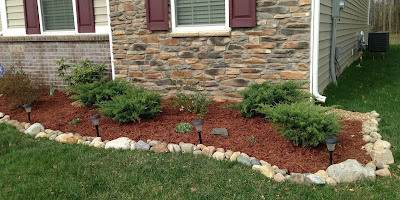
So, I was a little bored with the shape of the large flower bed in the front of my house. It really needed a little something. I really have an aversion to hard straight lines in a garden  I've expanded the flower bed along the garage as well as lengthened it. I was able to spread out the juniper bushes and bring the quince forward away from the wall.

As you can see in the picture below the flower bed cuts off at an odd spot. behind the downspout. My plan is to eventually run a flowerbed down the length of this side of the house to match the other side of the house. We'll see when I actually get that done. :)  It is a whole lot of work pulling up all the grass and breaking up the clay soil and amending it with good garden soil.


Side Yard Clean Up!

What a mess!
Clematis and Knock out Rose looking sad.


It's amazing how fast the grass will take over when not kept in check. The biggest part of this flower bed had my sunflowers in it last summer and after they died off in the fall I cleaned it out and left it.


Tilled in garden soil...

So, it took quite a bit to get it cleaned out and ready for more sunflower seeds! 
My husband found a small battery powered cultivator at our second home, Lowes, and it worked like a dream! It really made it so much easier to clean things out and then till in garden soil to amend our terrible indiana clay soil. Hopefully one day, probably years down the road, my soil will be perfect after adding in all the good stuff!  


After the cleanup! 

Mad About Mulch!

Mulch always makes such a huge difference in the flower beds, it makes everything look complete and cohesive. And it helps with weed prevention and moisture retention for your plants.

There are so many different options when it comes to mulch that it can get very overwhelming and you find yourself asking, "what kind should I get?" "What color and are the not natural colors safe for my plants and all the wildlife that likes to come visit my yard?" "and what about recycled rubber mulch?"
I've done a lot of research and found that it really comes down to personal preference. As for the dyes they use for red and black mulch its typically vegetable base and safe for plants, sometimes the red is colored from Iron Oxide and the black from coal and are naturally occurring substances and ok for your yard. 
The problems with mulch being dangerous is more when they use wood that has been chemically treated. But a good rule of thumb is to check the labels before you buy! Check the link out below for some more info! 
Read more: What Is Black Mulch Dyed With? | eHow http://www.ehow.com/about_6782815_black-mulch-dyed-with_.html#ixzz2T8qq3UT7

Clematis and Day Lilies
Knock Out Roses


Thursday, May 2, 2013

Spring Has Sprung!

Spring cleaning! 

After a winter that seemed like it lasted forever spring is finally here and we've been hard at work cleaning out our flowerbeds, expanding our garden and watching everything come back to life! Last spring consisted of us digging all of our flower beds and planting everything new, so this year is completely different.
It's been so much fun watching the plants and woods behind our house change daily. 

March...

I love watching the woods behind our house turn green and fill in. 
Nature Preserve behind our house.

Sedum Love!

When I was taking advantage of a warm march day and clearing out some of the old dead plants from last season and noticed the sedum peaking it's head up through the leafs! Such amazing chartreuse green color!
If you want something low maintenance that does well from full sun to shade than this is the plant for you! There are many varieties and they have beautiful clusters of flowers in late summer to fall. I have both the Autumn Joy and Neon in my yard and they both have amazing color!


Those Darn Squirrels!!! 

Before


We bought this beautiful mosaic bird feeder at Lowes and got it filled and all set up and absolutely loved how it looked when the light hit it.


 We now have 3 feeders along the nature preserve and there is an abundance of different birds that come to visit daily. But along with the birds we have a herd of squirrels that love to feast on the free grub. 


After :(
So of course the next day I look outside to see this guy feasting on a pile of bird seed with my new feeder broken on the ground!

Needless to say I was not very happy! But hey, I guess they have to eat too.
At least we were able to take it back and have it replaced with no questions asked. The replacement feeder must be a little more sturdy because it's still intact and I see one of our little furry friends sitting on it almost daily. 


Until next time... Happy Spring!